Hello, welcome to my little tutorial on creating patches for PRP (or at least the way I did it). It is suggested to read the Manual as a reference first. This guide heavily relies on the CK fixes, and I will be using the clean method only.
Previously I mentioned that MO2 was okay to use with the clean method since I thought the USVFS would work. Unfortunately this isn’t true, during my generation steps with MO2, I noticed flickering occuring when doing my Xander’s Aid patch. Using the same steps as below but with placing the mods in the Fallout 4/Data folder (manual installation) I did not notice flickering in the same location. All my patches where done with placing the mods in the Fallout 4/Data folder so there should be no flickering in the cells. Finally, just a reminder, I don’t support Vortex users since I am not familiar with the program.
Before I begin the guide, let’s talk about what needs to be patched:
Since Bethesda has migrated from their launcher to Steam, the Creation Kit is stubbed with Steam’s DRM. This will cause problems because in the Manual we need to change the hex values in the Creation Kit and the binary data is different, so the hex’s to change are also different and located somewhere else. Rather than wait for someone to find the offsets again, what you can do is run Steamless, with the default settings, on the Creation Kit, replace the current Creation Kit with the unpacked one (rename the exe), and apply the hex edits in the Manual.
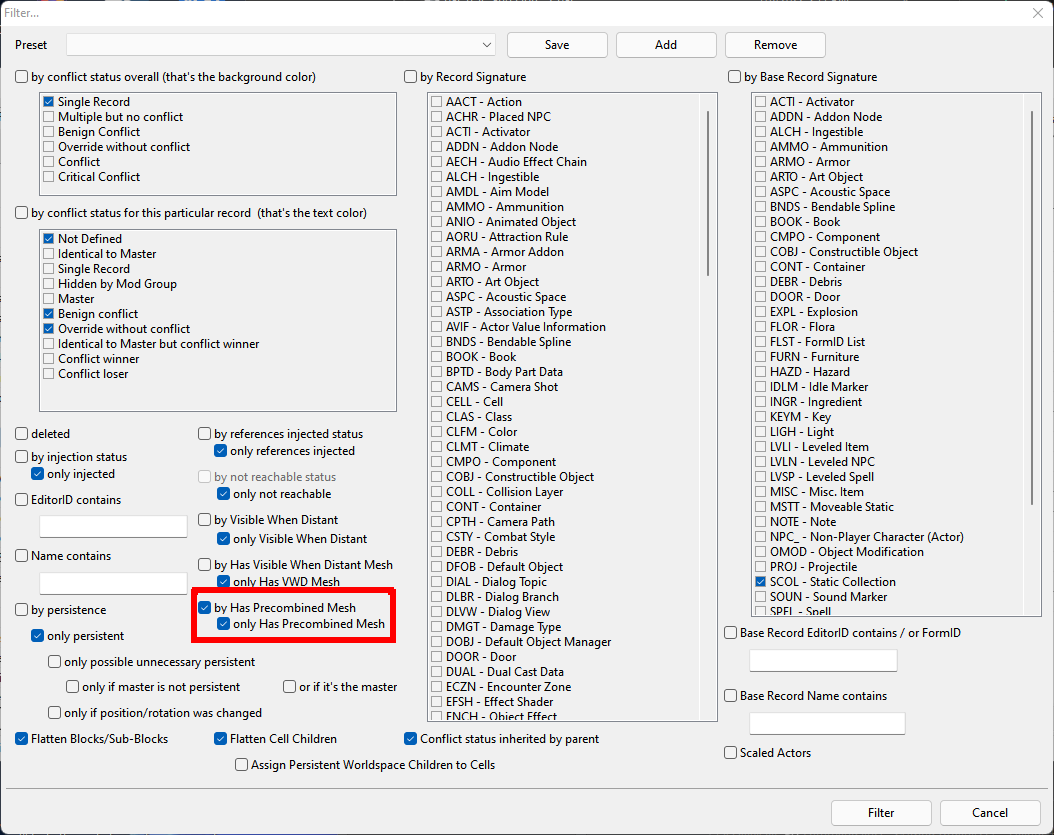
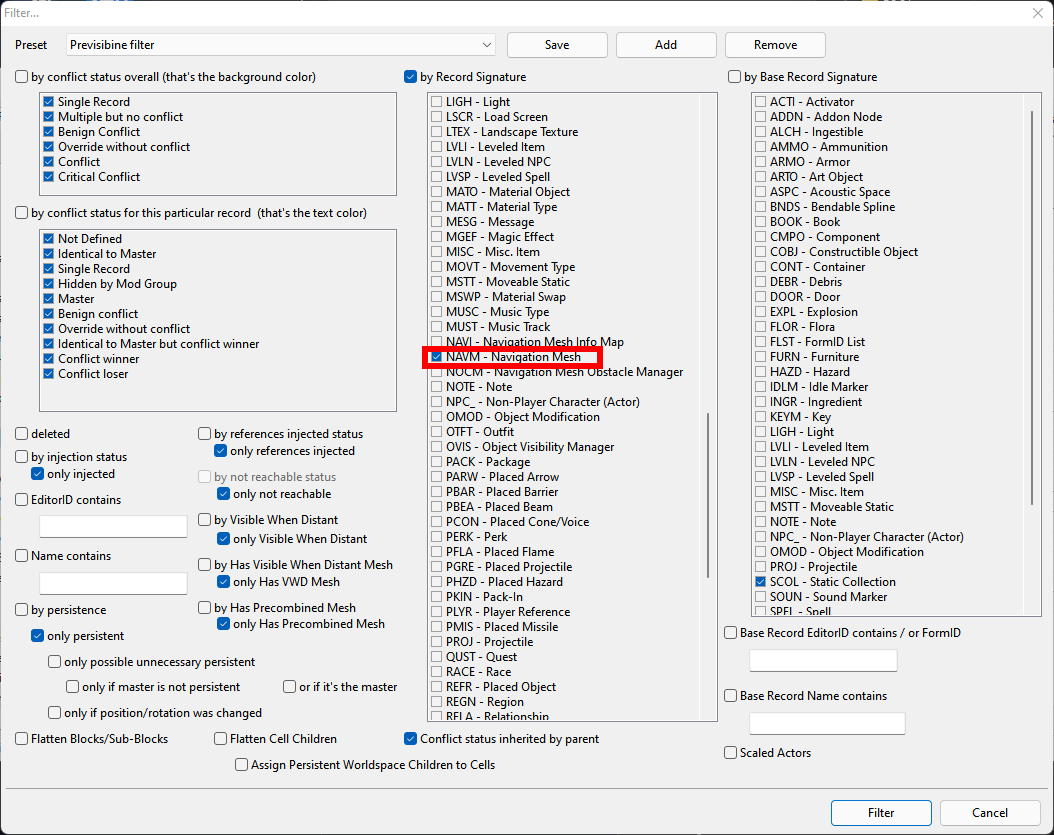
Once you have figured out which mods would need PRP patches, let us get down to business. You should open xedit with just one of the mods in question and PRP (I do not believe load order would be relevant here). Deep copy as override the Cell and Worldspace records of the plugin in question to a new esp file, that is a plain esp file (no esl/esm flags set), you can name the new plugin with spaces since this guide is using the CKfixes, as mentioned in the Manual, but I still prefer to name the file without spaces. Apply the “Apply Material Swap” script to the newly generated plugin and wait for it to finish. Once it is done, add every plugin as a master4. Apply a filter to show only navmesh entries on your plugin only Pic2. Remove every navmesh entry and only the navmesh entries (keep the Cell and Worldspace records)5. Now check your plugin again, if there are no subrecords in the CELLs you would need to create an intentional ITM preferably in the temporary references subrecords67. Now it is time to update the Version Control Info. You can do this in two ways: Saving the esp file in the CK (slower) or using this xedit script (faster). If you saved the esp in the CK, open the plugin in xedit and check for errors89. If your PRP patch is free of errors, I recommend backing up your PRP patch file. Now it is time to do the precombine generation.
Gotcha, before we do the precombine step, I recommend creating batch files or powershell scripts for doing these steps. If you wish you could skip this step, but I swear batch files will make your life easier especially when working with multiple patches in question or if the creationkit crashes for whatever reason (more info on that below). For your convenience, I created 4 batch files for each step that will happen for the Creation Kit just replace the bracketed area with your plugin’s name (I will be using f4ck_loader.exe as the executable instead of Creationkit.exe because I use an enb but you are free to switch it to whichever executable you want from the Manual). Place these files in the Fallout 4 root folder (where the exe is) and replace the brackets in the batch file to what your PRP patch’s name is with the extension.
Now you are at the Precombine generation step, for this you can choose to follow the Manual or use the batch files. There are two options for doing this step, copying all the mods (including the ba2 files. If the files are loose, I recommend packing them in a ba2 beforehand) required for your patch to the data folder in Fallout 4 folder. Once you have done that, you can open the first batch file, type this in the command prompt: f4ck_loader.exe -GeneratePrecombined:pluginname.esp clean all, or type this in powershell .\f4ck_loader.exe -GeneratePrecombined:pluginname.esp clean all, the Creation Kit will open and begin generating the precombines and close when it is finished giving you the meshes/precombined folder, a .psg file, and a CombinedObjects.esp file.
The CK may crash with an exception 0xc0000005, sadly this can happen when using either option above. The only solution so far is to exclude the cells from precombine generation by removing them in the PRP patch. So far I have only experienced this when trying to generate precombines for Fusion City Rising, Hookers of the Commonwealth, and Outcast and Remnants and have listed the Cell records here. If you are creating a patch, and notice the CK crashing during precombine generation, please submit a pull request or issue with the problematic cell records that way other people can be aware when they are generating precombines.
If you get a psg file that is 0kb in size my only guess is you typed something wrong in the terminal.
Once you get the CombinedObjects.esp, you should check for errors in the plugin using xedit. If any errors appear (exclude 9 type errors) then something went wrong and this usually happens in the Preparation of the esp patch step. The next step is to either use Searge’s 03_MergeCombinedObjects.pas script or to save the plugin in the Creation Kit.
This is the faster of the two options. Put the script in your xedit’s Edit Scripts folder and run the script on the PRP patch plugin.
This is the slower method of the two options. Open the Creation Kit and set the CombinedObjects.esp as active. Once the CK finishes referencing everything, just save the plugin. Then open xedit and use the Merge overrides into master.pas script on the CombinedObjects.esp plugin and have it merge into the PRP patch plugin.
The CombinedObjects plugin can be safely deleted since we are now done with it.
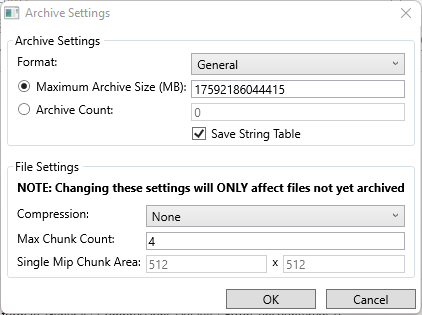
Now that we have generated the meshes for the precombined objects and the shared geometry file, .psg file, it’s time to do two things, pack the meshes folder and compress the shared geometry file. There is a limit to how many precombined files you can have as loose files when generating previs, Star/Ben/Disk says 8,192 precombined meshes, another source says anything around 32,000 precombined meshes. So, I suggest to pack the meshes into a ba2 before continuing on using these settings10 using Archive2. To pack in archive2 is simply dragging the meshes folder from generation to the program. If there are many files in the meshes folder the archive2 program will freeze but it will not crash as it is processing all those files. I have not used Pra’s Collect Assets.pas so I have little information on what to do, you can follow the Manual for that. I also do not trust CAO for Fallout 4 (Skyrim on the other hand I give my full trust on). Now that you packed your meshes into an archive, you can safely delete the loose files. It’s time to compress the shared geometry file. So, there is two ways of doing this, either run the second batch file or type these in either command prompt f4ck_loader.exe -CompressPSG:pluginname.esp or in powershell .\f4ck_loader.exe -CompressPSG:pluginname.esp. This process generates quickly and after it is done you should see a .csg file. Like in the Manual, you can delete the .psg file once you have the .csg file.
Now comes the previs setup but first we need to populate the cell index by creating a .cdx file. So you can run the third batch file or type f4ck_loader.exe -BuildCDX:pluginname.esp in command prompt or .\f4ck_loader.exe -BuildCDX:pluginname.esp in Powershell. Once you have your .CDX file we can generate the Previs data.
This is the part where you need a lot of ram, page file/swap, and patience (can take between 30mins to hours). If you are on 16gbs of ram or lower, I suggest moving the texture archives to another location temporarily, like the Manual suggests. If you are above 16gbs of ram, I doubt you would need to move the texture ba2s, but if the previs generation crashes it might be because you ran out of memory. All my patches, TFTC, Fourville, Xander’s Aid, etc., were ran using 16gbs of memory. The only time I crashed from lack of memory was generating previs data for Universal Working Bathroom Fixtures (there was a nice deal for 32gbs of ram so I took an upgrade).
The final generation boss has arrived. As with all the other steps, you can run the final, fourth batch file, type this in command prompt f4ck_loader.exe -GeneratePreVisData:pluginname.esp clean all, or this in powershell .\f4ck_loader.exe -GeneratePreVisData:pluginname.esp clean all. Once the creation kit finishes the generation, closing itself, you should see a VIS folder and a PreVis.esp plugin in either your DATA folder.
There are a few reasons why Previs generation has failed:
Assets manager.pas script, making sure it is selected to Check for missing assets, to the plugin you are trying to patch or to your plugin then press OK. As for a solution, I do not know of any other than asking for the missing meshes.It’s now time to use Searge’s 05_MergePrevis.pas or to save the PreVis.esp in the Creation Kit.
This is the faster of the two options. All you have to do is put the script in XEdit’s Edits Scripts folder, just like in the Precombine Generation, and run the script on your PRP patch plugin.
The slower option, that I have done in the past. Open the CK and set Previs.esp as active and then save the plugin. Open the now saved PreVis.esp file in xedit and apply the Merge overrides into master.pas your PRP patch plugin.
Once that is done, save your esp but do not close FO4Edit just yet. If your plugin contains Worldspace cells, you should check and remove extra Previs files that your plugin does not use, this part is done using the collect assets script in FO4Edit (similar procedure to the Manual but for VIS). Click on your patch plugin and then run the collect assets script, once the script launches leave everything as default and press okay, a second window will appear with a confirmation of everything to be packed, leave everything as is and press okay. We do this rather than manually packing the archive because of a fault in previs generation. RVIS (in xedit) is the center of a 3x3 grid in the map and the CK does a 3x3 block for generating previs on that center but with generating previs, every cell entry is marked like a center and produces UVD files we shouldn’t need or want (Thank you Hap in discord). After the script is done you can then move the archive created from the collect assets script under your “[FO4Edit’s directory]\asset-collector-output\” to your FO4’s DATA folder.
While you could leave everything as an ITM, your plugin may be flagged by programs such as loot as dirty. Since we are just copying records and generating previsibines, it is recommended to clean your patch plugin to make sure another mods’ functions could work. Using FO4Edit’s QAC argument, clean your patch plugin.
Now that your have generated everything, it is time to see if your generation worked correctly on the first try. I would select a few CELL locations and just run around the area to check for any preculling issues, if you found any please wait for a future guide on how to fix this (tbd and probably on another md file).
(tbd and probably on another md file)
Guide was built using 1.6.3. CK Fixes 1.7 has known generation issues and was pulled a while back. 1.8 also works provided PRP - Main.ba2 is compressed. As it currently is, it will not fit under the 4gb limit. ↩
Guide will be using this because I use an enb ↩
For now, I suggest using the version described on the mod page with bold text since it is labeled stable. The PPF listed in the Github will always be the latest version but for simplicity sake I suggest using the one shipped in the mod page. ↩
That is all the DLC + UF4P + PRP + the plugin in question’s masters. There is a problem when the CK adds the masters of other plugins to your new plugin and that causes errors when generating the precombine data. ↩
We will be saving the esp in the creation kit (as opposed to using the copy version control script in xedit) and sometimes the CK adjusts the navmesh entries to some unknown parameters, so for simplicity’s sake we skip everything related to navmeshes. ↩
The Precombined Timestamps (PCMB in xedit) and the Combined References (XCRI in xedit) will not update if the cell has no subrecords. ↩
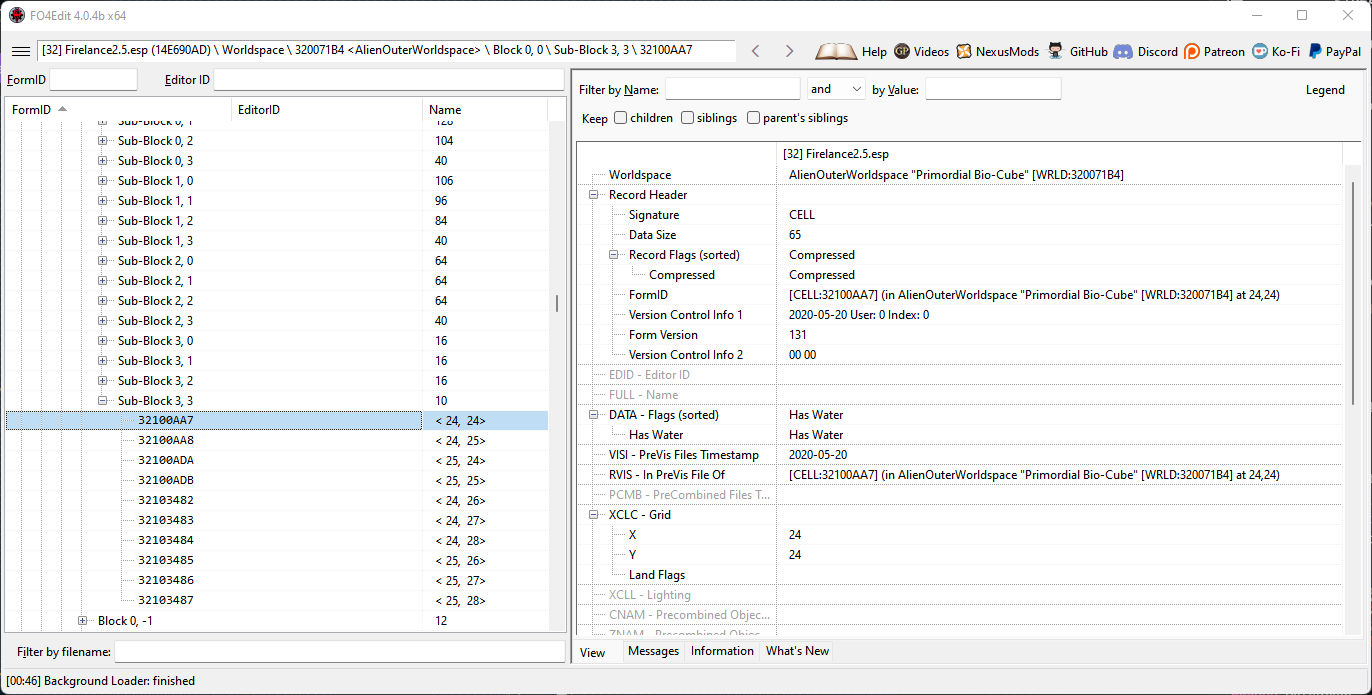
There is an exception to this however, if there is a mod that creates its own worldspace (let’s say Xander’s Aid for example Pic3) then there will be records with just navmeshes in them, and in that case, you just keep the record (they might still be used for the previs step later). ↩
If XPRI errors are present, you probably didn’t add the plugins above as master to your PRP patch plugin as mentioned earlier. You should remove all the Cell and Worldspace entries in xedit and start over again with the preparation step, making sure that all the plugins are listed as master files. If the XPRI errors are still present, create an issue to me (feeddanoob) or contact me in the Collective Modding Discord (also feeddanoob) and I will try to see what the problem is. ↩
Please note: Some of the parent mods have XPRI errors in them too, example is Nuka World Pic4 so you can ignore those. ↩ ↩2
Note: The Maximum Archive Size could be anything your hardware can handle, I am only using the default value that it pops up with. The main setting to be focused on is the Compression Setting to none. Please note if you do decide to pack into smaller archives that you will have to do additional work for the game to use those smaller archives (I suggest/recommend packing them all in one archive if you can) ↩